California Ajax Solutions Team
www.CalAST.com
Chapter 4 - The Template Builder
In this chapter, we'll talk more about how you can take some of the work out of generating template files that provide a model of your database.
At this point, you might be asking just how many of these template files you will need. The simple answer is "at least one," since a report must know what template it is designed to work with. But there are valid reasons why you might wish to have more than one. Suppose you are running a law or medical practice, and you want to let your users review some information on-line. But you clearly don't want them looking at your financial information in the same database. So DynaCRUX lets you create more than one template. A Staff template lets you generate reports with access to pretty much everything, and a Customer template only allows certain tables or fields to be seen. You can create as many templates as your business needs.
Of course, you can design a web application that provides this kind of obstructed view, but it's generally safer to block access at a lower level. In DynaCRUX, you can allow users to design their own reports. Since you have total control of the visibility of objects in your database (by including or excluding them from the template), you can protect your sensitive data.
We recommend that you generate separate templates for different privilege levels. Your trusted staff members can have access to all the possible templates through the DynaCRUX user interface (which has no restrictions). Then, your web application can include a version of Report Generator which can only "see" the templates that a given user group can access. One simple way to do this is to create separate directories on your server for different privilege levels. Each will have the same structure, but the Templates directory will only contain the templates you want each group of users to see. This will prevent some users from accessing tables that you consider proprietary.
We should also mention that there's another very good reason for having more than one template. Editing a template allows you to add items to it (like controls and synthetic objects) and to remove certain items, like fields (database table columns) you will never use in reports. However, this latter action is destructive. Once a field has been removed from a template file using the template editor, it's just gone. It will no longer be present in the template file at all, so you cannot just "undelete" it. Of course, you can edit the template file with a text editor and put it back, but this is a somewhat error-prone approach. A better idea is to create a master template with everything in it, then one or more working templates that have been pared down - using the template editor - to get rid of extraneous information.
Getting Started
In this document, we will use the terms template builder and template editor interchangeably from time-to-time. There's really only one program, written in JavaScript, that edits a template file. It is also capable of building one from a database schema, which we will describe later. The only real differences are where it gets it source information, and how much server-side support is needed.
The template builder is normally started from the DynaCRUX main switchboard. This is (like everything else in DynaCRUX) a web application that is run from your browser. The switchboard is located in the DynaCRUX Views directory, and is called main.php. So if you installed DynaCRUX on your web server in a directory contained in your document root, you just point your browser to:
http://www.yoursitename.com/DynaCRUX/Views/main.php
Of course, you are under no obligation to use the DynaCRUX views. You can design your own web application that does pretty much the same thing that the views in the distribution do. But since the template-building part of DynaCRUX is only run by your IT staff (not users), it may not be worthwhile to spend a lot of time making it look like the rest of your application. It's up to you.
Under Template Operations, there are two links:
Edit an existing template - this just invokes the template editor directly, and prompts for a template name. The editor then reads up an existing template XML file and begins the edit dialog.
Use the Schema Analyzer to create a Template - this lets you create a new template by processing information about your database schema. If you click on this link, you are taken to the template builder setup page. Here, you can specify a configuration file, and choose to build from a prototemplate file (which we will describe later) or - more commonly - build from an SQL schema file that describes one or more tables in your database. You can also merge a new table into a template file. This can happen if your reporting requirements change, and you just need more tables to generate the reports you need.
Operation Overview
The Template Builder is really a very complicated (and powerful) web application that does the following:
- Reads up information about your database
- Builds internal structures to contain this database model
- Takes you through a dialog to modify the model, including deciding what's OK to be in your template
- Writes a template file from the model
Where does the information come from? There are two possibilities. First, it can start with an existing template file. In that case, you can either make changes and save it back to the original location (i.e., use it like a very interactive editor), or you can filter out some information to make a subset template as described above. In that case, you would save it under a different name.
A word of warning about editing templates is in order here. Reports are associated with templates, and depend on the contents of the template remaining fairly constant. For example, if you remove a table from a template and that table had fields that were used by reports, then they would no longer work. (You would get a warning at run time.) So be very careful when changing your template files. You might need to regenerate or edit your reports.
That said, reports and templates synchronize through the "internal" (XML) names, so you can change quite a bit in your template without breaking anything. And, of course, if you add a new table to your database and the template file, that would not break any reports. They would not have known about the table when they were designed.
The other choice for finding information to use in template building is that you can have your database export information about the tables you want to report on. The file containing this information can be processed in much the same way as a template, but it contains a bit less information. We'll describe this in the next section.
Whichever method you choose, once the information is loaded, Template Builder starts a dialog to walk you through the process of template creation..
Schema Analysis
Most database programs have a mechanism for exporting the database structure, with or without the contents, to a file. Different database programs use various mechanisms to implement this. For example, many users of what's called a LAMP stack (Linux/Apache/MySQL/PHP) are familiar with a web-based program called phpMyAdmin. This set of tools lets you do many things, including export the database structure to a SQL file. The exported file can be used to reproduce the database structure on another server. Or, for us, it can be used to generate a large percentage of what DynaCRUX need to know about your database.
Similarly, Microsoft SQL Server has a management console that will let you perform this task, and PostgresSQL has a command to dump the structure to a file. The syntax of the files produced by various databases is different enough to present a challenge in automating this process, but it can be done.
This kind of file is sometimes called a database schema file. In this chapter, we will focus on the very popular MySQL database, and use some generated schema files to build much of a template. When you start the DynaCRUX Template Builder, you tell it if you want to start from an existing template or a schema file. (The switchboard gives you this choice.) If you choose to use the schema file, then the first part of this software invokes another program called the Schema Analyzer to try to obtain as much of the information about your database as it can from a saved schema file. This keeps you from having to enter it manually.
Where does DynaCRUX find these schema files? Unlike reports and templates, we do not assume you have these stored on your web server. This might pose a security risk. So, the schema files should be stored on your computer - the one where you are running the DynaCRUX schema analyzer. It uses the file upload facility within your browser to make a temporary copy on the server. There is a size limit here, so we recommend that your schema file contain only structure - not data. The tools used to build the schema file usually provide you with this option.
Prototemplates and Merging
While you probably don't care how DynaCRUX does its work internally, there are some possible operations that are best understood if you know a little about how the SQL analysis works. So, we will now introduce the concept of the prototemplate. The prototemplate (which can take several forms) is an XML representation of your database structure. Isn't that what the template file is? Yes, but the template file contains much more information, and is usually built from the prototemplate. So the prototemplate is a step along the way from a schema (written in SQL) to a template (written in XML).
In its simplest form, the prototemplate is invisible to the template creator. The SQL Analyzer running on the server receives a SQL file from the client machine, produces the prototemplate and passes it internally to the template editor. The template editor runs in your browser. Since it already contains the prototemplate, it can use that to build the dialogs that result in the stored template file. As a user, you simply specified the schema and ran the editor to produce a template. You did not need to know of the prototemplate's existence.
However, the prototemplate can also be saved as a file on the server. It is produced by telling the SQL analyzer to save the file as part of doing its job. There is a checkbox on the template builder web page that does this. The prototemplate files are stored in the DynaCRUX uploads directory. Once a prototemplate file exists, you can build a template from it instead of from the SQL schema. There is no particular advantage to building from a prototemplate. It exists because there was a standalone Java application that produced prototemplate files, and there needed to be a way build a template from them. But it turns out prototemplates are quite useful for extending a template.
Suppose you have already implemented a DynaCRUX system, and one of your customers decides a new report - requiring an addition table - is needed. Do you have to start over? You could, but DynaCRUX now provides the capability of merging a prototemplate file into an existing template. To accomplish this, you start by creating a schema file for the new table. You will probably name the file for the table name contained within it (e.g., Orders.sql). Then, run the schema analyzer on Orders.sql specifying that you want a saved prototemplate. The schema analyzer will produce a file named Orders.sql.xml in the uploads directory. Once you reach the dialogs in the template editor, just click on the back button and return to the template builder web page. The file has already been created at this point, and you don't need to go through the dialogs.
Now, specify that you want to merge the newly created prototemplate. This will take you to the template merge application, a slightly modified version of the template editor. It will have internal access to the specified prototemplate, but you will first need to specify the template with which it will be merged. The merge application will build internal structures based on both the template and the prototemplate. You then run the dialogs to produce a new template file.
Now, let's move on to running the template builder.
Retrieval Information
We need to make it clear that while DynaCRUX can analyze your database for you and save you a good deal of time, it can't understand the needs of your customers and staff. Only you can know what kind of reports you will need, and that information is a big part of the controls section and the presentation section. So in all honesty, DynaCRUX can't help you too much in that area. All it can do is generate a proper structure and let you fill in the blanks.
On the other hand, DynaCRUX is quite good at figuring out the retrieval possibilities. If you give it a schema file that describes how to create a dozen tables in SQL (including relationships if possible), then it can generate a very complete list of tables and their elements from that schema. This is much easier than hand-coding the template in a text editor (trust us, we've done it both ways).
Let's go back to the simple wine list database we introduced in Chapter two. There, we hand crafted a template file to include only what we needed for the report. What would it have looked like if we had generated it?
The simple answer is that it would have contained only a retrieval section, and that section would have contained only elements. Also, DynaCRUX can't know what you want to call things in your display, so it just uses the database column names as the display names. However, it does understand a good deal about what's legal in xml, to it manipulates those column names to be "XML-legal". It just follows a fairly simple set of rules:
- Everything is mapped to lower case (this is really just a preference, not a rule)
- Spaces are replaced with the underscore (_) character
- Database-specific special characters like back-quote and brackets are removed
- Any name that does not start with a lower case letter is prefixed with the string xml.
This last requires a bit of explanation. Suppose your database had a flag named "1 Time Charge" in a table. This is legal in some databases. So, the first step would be to map it to "1 time charge" and then change it to "1_time_charge." However, in XML, tags can't start with a number, so it still is not a legal name. DynaCRUX changes this to "xml1_time_charge" so the name can be used in data transmission. Of course, you are free to manually change the name to something you like better after the template is generated, but at least we guarantee that you could use it as is.
The Template Builder application enforces the DynaCRUX rule that every object has to have a unique name. So if you have a foreign key in one table and a primary key in another table both called LocationID (this is common), it will change the second occurrence to something like locationid1. It only does this for the XML names, used internally to synchronize templates and reports.
Of course, the original five tables contained 25 database columns or fields. Since we only needed eight of them, we manually created only eight objects to get to a simple wine list report. Automatic generation will produce objects for all 25 columns, even though you only need eight right now. The good news is that it wasn't any more work to produce 25 objects than to produce eight, and you didn't have to do the work. Besides, you might need them in the future.
The schema file may or may not tell you anything about the relationships between tables, depending on how your database was designed. DynaCRUX analyzes your schema file and tries to figure this out, but it can only process what it finds. The good news is that it has an additional source of information: you.
The DynaCRUX template builder is an interactive web application, so it can ask you to guide it through the parts of your database design that are not expressed in the schema file itself.
In this chapter, we're going to use an extended version of the wine database - in fact, it's a real one used by a web application. So it includes a few things we haven't talked about before. Here are the tables and their relationships, as generated by phpMyAdmin:

Running the Dialog
Here's what the template builder does when you run it:
- Runs the schema analyzer against a schema file you provide to understand the tables and columns in your database, or loads an existing template file as a starting point.
- Finds out which tables you want included in the template you are building (it defaults to all).
- Asks you if you want to have a base table (this will be explained later)
- Asks you to review table relationships, adding any that were missed and fixing ones that need your input
- Lets you add design-time controls and filters to the template
- Allows you to create synthetic objects (more about these later)
- Gives you a chance to change any display names to ones your users will prefer
- Saves the template file to the server
Choosing Tables to Include
The first step in Template Builder lets you look at a list of all the tables found in your database. All are checked for inclusion in your template file. This is appropriate for building a "master template file" for your staff. But if you are building a template file for customers, you probably want to keep some of your tables (e.g., financial ones) out of it. Here, you can select which tables to suppress by unchecking the boxes next to the table names.
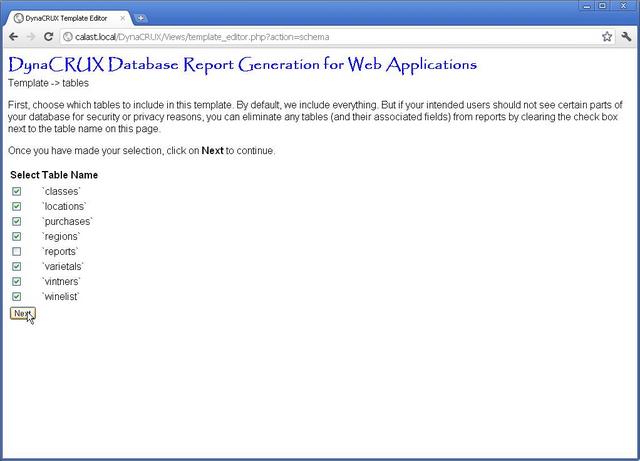
Since our example database is pretty small, we could choose all tables by doing nothing. But the reports table is just used to store DynaCRUX reports. There's nothing useful in it for building reports, so we will uncheck the box to exclude it from our template.
Tables excluded in this step will be ignored in later steps, so we have to do this first. When the list of tables is the way you want it, click on Next.
Specifying a Base Table
The next thing that the template builder asks is if you have a base table defined. DynaCRUX has a preferred mode of operation, which is to generate SQL JOIN statements based on there being one table to which other tables are related. This is common in database design. In our wine list example, the wine list table is the base table, and other tables have relations to it. (There are also relations among other table not involving the base table.)
For example, there is a varietals table that is referenced by the base wine list table. Each varietal has a unique ID (its primary key), and each wine in the wine list has a reference to that table/key combination by specifying a value for that wine's varietal. It's not a name, it's just a number that is an exact match for one of the primary keys in the varietals table. This is called a foreign key. Given that DynaCRUX knows this relationship, it can generate SQL fragments like this:
... FROM winelist LEFT JOIN varietals ON winelist.VarietalID=varietals.VarietalID ...
This is not only very efficient, it guarantees that you will only get one line per wine in the result set, which was the goal. You can pull information from as many tables as you like, and there will still only be one line, because of the JOIN structure. The first table referenced (after the FROM keyword) will be the base table.
Since there is nothing in the schema to explicitly say "this is the base table," the template builder gives you a list of tables and asks you to choose one. If you don't choose one, things should still work, but the generated SQL will be different. If it makes sense for your database design to choose a base table, then please do so. If you are working from an existing template with a base table, it will be shown as Current Selection.
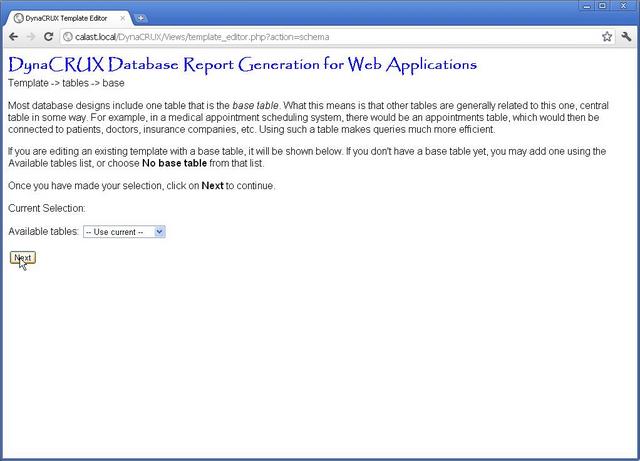
In our example, the base table in called winelist, so pick this one from the drop-down box and click on Next. If you really don't want a base table, choose No base table from the Available tables list. You can't choose Use current if there is no current base table.
Table Relationships
We now need to look at all the relationships themselves. The operation of this part of Template Builder is the most complicated part of the application, but it has a lot of important issues to resolve.
The SQL fragment in the previous section shows a relationship between two tables (winelist and varietals). This relationship is based on the identically-named (that's not required, but is common) field VarietalID in both tables. So, how would DynaCRUX know this? If you have explicitly specified a foreign key constraint in your database design, then the schema file will have that information. The schema analyzer can just use that as-is to generate a relationship, because the constraint defines both the primary and foreign keys that make up the relationship. DynaCRUX calls this an explicit relationship.
If you do not have foreign key constraints in your database (more about this in a moment), then the schema analyzer can identify possibly interesting relationships on its own and flag them for you to look at. These are implicit relationships. And if your schema file does not have this information either, then you can specify the table relations interactively in the template builder.
Most database programs just allow foreign keys as a normal part of the design. This includes Microsoft SQL Server, PostgresSQL, Oracle, etc. However, MySQL only allows them under some circumstances. And it is certainly true that many successful database designs don't use them at all.
So, let's take a step back and explain what such a constraint means. In a database design, you can ask the database itself to enforce rules. A foreign key constraint specifies the following:
- A field in table A, called the foreign key, refers to a field in table B. Its value will be an exact match to exactly one value in table B. This establishes a relationship between the two tables. Here, several wines may be Chardonnays, so they would all refer to the Chardonnay record in the varietals table. This is called a many-to-one relationship.
- The foreign key does not have to refer to the primary key of the referenced table, but the key it refers to must at least be unique. That is, there can't be multiple rows in the referenced table with that value - there must be exactly one.
- The constraint prevents you from inserting a record whose foreign key does not match exactly one row in the referenced table. So, you could not add a Pinot Gris to the wine list if there was no Pinot Gris record in the varietals table. You would have to add that to the varietals table first.
- Similarly, the constraint prevents you from removing the record from the referenced table if there is an existing foreign key referring to that record. If you ever encounter the term "referential integrity", this is what it means - the references are known to be good.
With MySQL, you can specify the underlying database engine, and the same set of features is not supported by all of them. The default storage engine, MyISAM, does not support foreign key constraints. The InnoDB engine does support foreign key constraints. So if you want to use them, then the tables involved must specify InnoDB. (In MySQL, each table can specify its own storage engine, although commonly they all use the same one.)
In either case, your database schema file can identify these referencing fields as keys - they won't be called foreign keys. In MySQL, they may look like this:
KEY `VarietalID` (`VarietalID`)
The first instance of VarietalID is the name of the key, and the second (in parentheses) is the name of the column. They're usually the same if no foreign keys are involved.
If foreign keys are specified in your database, they may come later in the schema file as ALTER TABLE commands. For example, suppose you had a table of books and a table of authors. The book table has a foreign key reference to the author, providing a many-to-one relationship (many books written by the same author). Here's what it would look like in MySQL:
ALTER TABLE `book`
ADD CONSTRAINT `book_FK_1` FOREIGN KEY (`author_id`) REFERENCES
`author` (`id`);
Other database programs do things slightly differently. For example Microsoft SQL Server does not usually emit the explicit KEY specifications in the table definition. It just uses the ALTER TABLE command to specify the foreign key information, and DynaCRUX can find everything it needs from that statement. It is also possible to simply declare the foreign key constraint as part of the CREATE TABLE statement, and a number of programs do just that.
The schema analyzer reads the schema file and tries to figure out all the relationships on its own. When it has completed its analysis, it will display a table of all these keys that it finds, showing you what it believes are:
- The referencing (foreign) table
- The implied foreign key column
- The table being referenced
- The primary or referenced key of that table
To show you how DynaCRUX works, we're going to deviate from our database pictured above. We choose to use a schema that does not include the locations table, which results in an incomplete reference. We're just doing this to show you how such a thing would be handled. We'll return to our standard schema file in the next section.
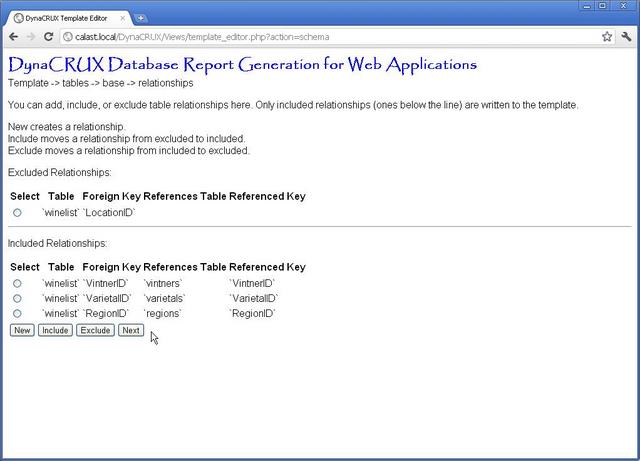
The screen will be divided into two parts, divided by a solid line. The table above the line is the excluded table - relationships that you do not want to include in your template. The table below the line is the included table - relationships you do want. Only the relationships "below the line" actually end up in the template file. How do relationships end up in one table or another?
If you are reading a schema file, all relationships start out as included, except the ones that are incomplete (as above). If you are editing an existing template, a relationship is excluded if you have already excluded the table that contains it in a previous step.
You can move relationships between the two tables. Suppose you wanted to exclude one of the relationships in the included table for some reason. You simply choose it from the included table by clicking in the button next to it (selecting it), then clicking on the Exclude button. This moves it to the excluded table.
In our wine list example, we need to add a relationship that the schema analyzer could not find. That is, each varietal has an associated wine class. In this case, the names of the fields don't match, so the schema analyzer can't "guess" what this relationship might be. That's fine, we just have to tell it to add the relationship. Start by clicking on the New button.
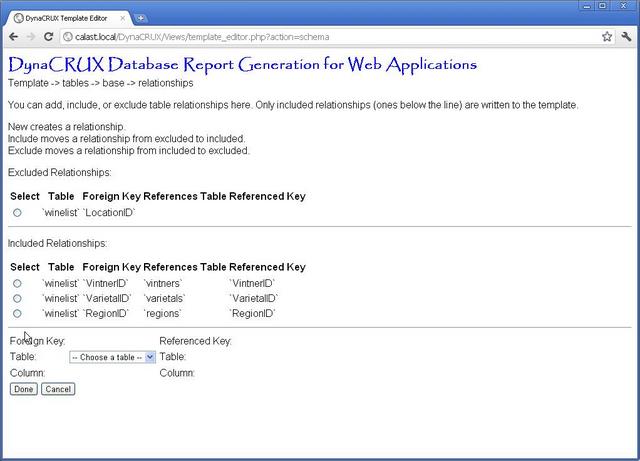
You see that a web form has opened at the bottom of the page. This form is progressive - as you specify things, it gets modified based on what you told it. Initially, it contains only a drop-down list for the foreign key table. In our example, this is varietals, so we choose that from the list.
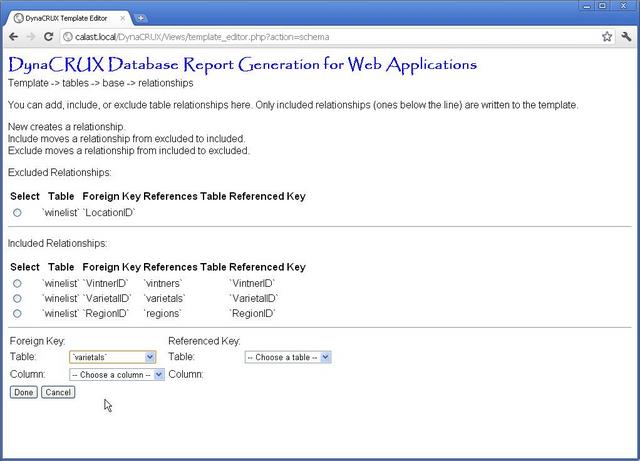
Note that more of the form is now filled in. The foreign key column now has a drop-down list with all the columns for the varietal table in it, since you told it this was the table you wanted. There's also a drop-down list for the referenced key table. This lists all the tables except for varietal.
We know that the foreign key column for this relationship is called WineClass, so choose that from the list.
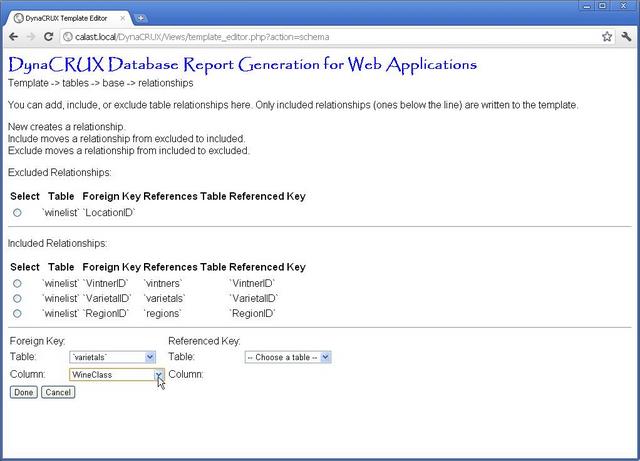
Next, we'll fill in the rest of the information - that this is a reference to the field ClassKey in the classes tabel.
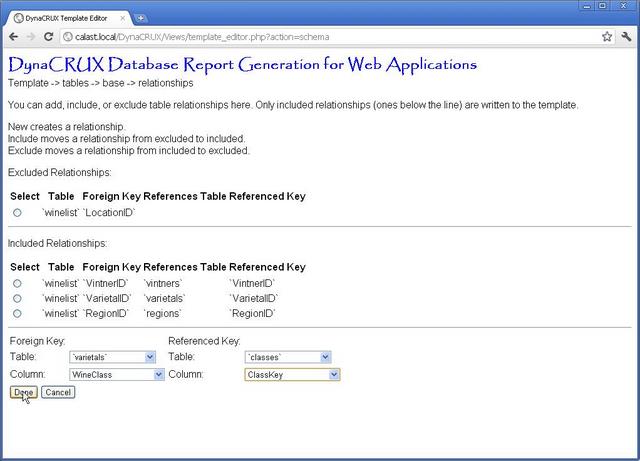
When we are finished, we just click Done to add this to the list.
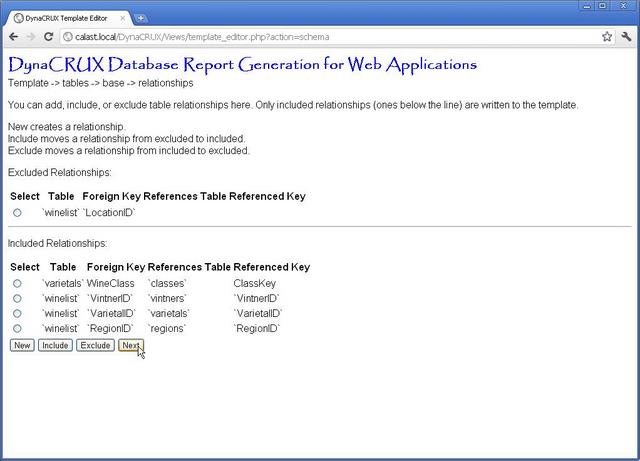
Once you are satisfied with the included table, click on Next to continue.
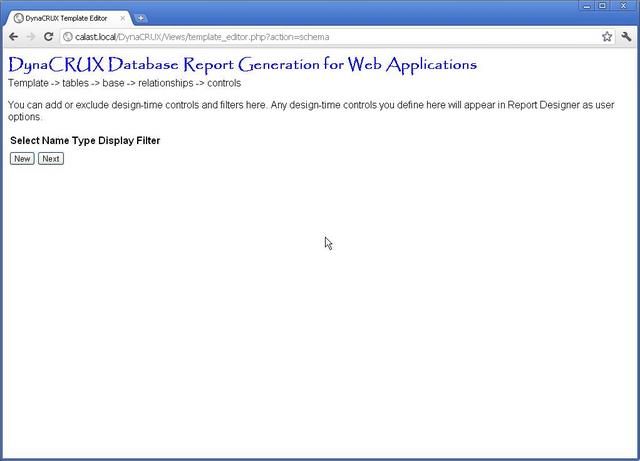
Adding Controls and Filters
DynaCRUX supports two types of controls - design-time controls and run-time controls. Design-time controls are stored in the template and are used in designing reports. Run time controls are stored in the report and are used to modify the report data when you run it. Since we are concerned with building a template file here, we will only talk about design-time controls.
As noted, DynaCRUX can analyze your database, but not your web application. So you are given the opportunity to add controls to the template file interactively. Of course, you don't need to do this at all, or they can be added later with a text editor (controls are pretty simple). But if you already know what you want, the template builder will let you add controls as it builds the template file.
What is a control? Basically, it's the front end to a filter that will be used to select data for your report. A control and a filter are different aspects of the same idea. The control is what the user sees, and the filter is what the database sees. When does the user see these controls? Generally, in Report Designer. They cause filters to be added to the generated report file, based on what the user specifies.
Controls come in several types, but they are very familiar to users of web or desktop applications.
- Checkbox controls allow you to define a filter and ask the report designer if that filter should be included or left out
- Textbox controls prompt the user for some text information, like a name. The value typed in will become part of the query
- Datebox controls are textboxes with a calendar overlay to help you get the format right
While checkbox controls don't have values - they only determine if the filter is included or not - the other types do. How are the values used? Your filter must contain a "$" symbol that will be replaced by the control value in report designer. Here's an example. Let's define an afterdate control. The SQL for this will be:
appointment.date>'$'
Whatever date is entered by the user is simply substituted for the "$" in the query. Remember that checkbox controls don't do substitution, though. So you should never use a "$" in your filter if the type is checkbox.
Now let's look at the screen that controls all this. What you see in this part of Template Builder depends on how you started. Since schema files only contain information about the database itself, if you are building a template from a schema you will simply see an empty list.
On the other hand, if you are editing a template that already had controls in it, there will be a table of such controls on the screen.
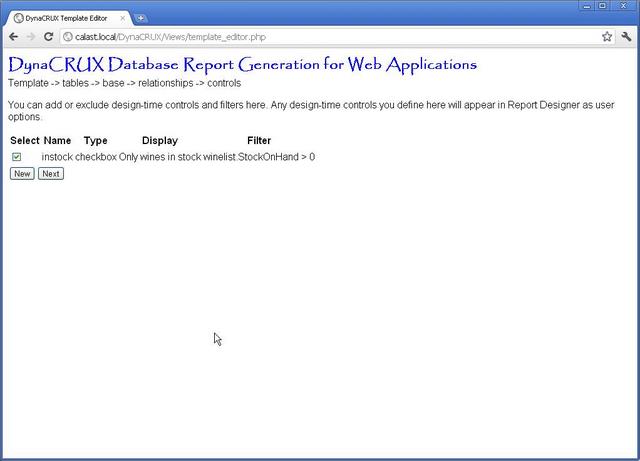
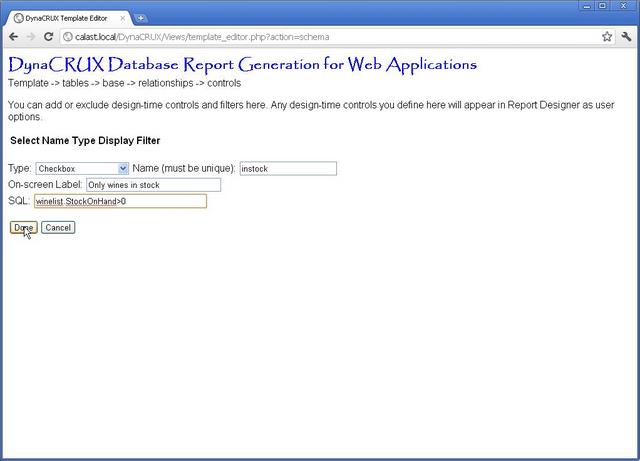
In our example, the wine list report is only interested in wines that are in stock. Thus, it has to ignore any wine whose stock level is zero. There is a filter we'll call instock that can be applied to a report to make sure you only see wines that are available. There is a corresponding control that shows on the screen when you are designing a report. This lets you specify that this report requires the instock filter.
Like most filters, the SQL code for instock is fairly simple:
winelist.StockOnHand > 0
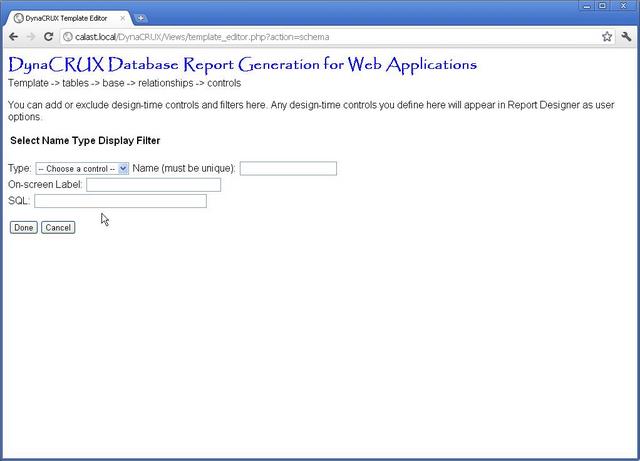
Since controls are simple, there are only four things you need to tell the application:
- The type of control (checkbox, textbox, etc.)
- The on-screen label, shown in Report Designer
- The name of the control
- The SQL for the filter.
A web form is provided for you to specify these values, and appears when you click on New.
Now we fill in the form for the instock filter:
Click on Done to save the information. The table will be updated with your new control. To add more controls, you can just keep using the New button and the form. If you don't want to include a control in your template (say, you made a data entry error), just uncheck the box next to it. Only controls that are checked will be included.
The Next button continues to the next step.
Adding Synthetic Objects
When the schema analyzer looks at your database, it automatically creates objects in the system for all the columns it finds. You can then use these in reports. However, we have noted that you can also create objects that don't correspond to columns in some table. A good example of such a synthetic object is the use of a built-in database function like COUNT.
Clearly, the schema analyzer can't invent these since it does not know what you will want, but we make it fairly easy to add them in the template builder. Let's add an object that represents the total number of vintners (wine brands, if you prefer).
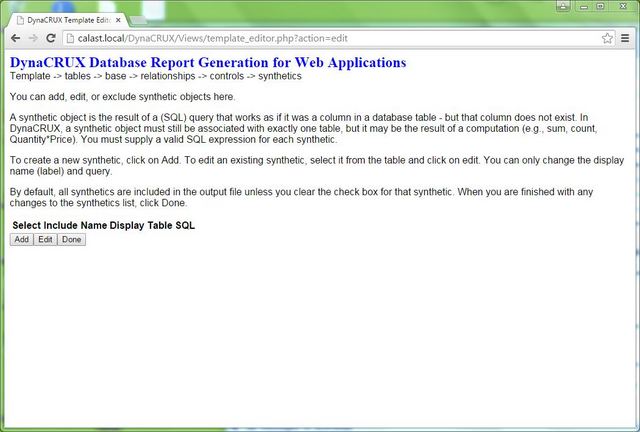
The table is initially empty, so click on Add to start the process.
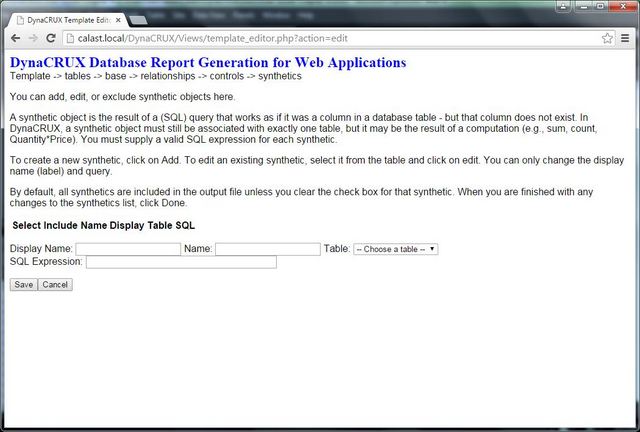
You provide information using a web form. What do you need to provide?
- A unique name for this object
- Some display (screen) text to label it
- The table with which it is associated (required)
- The SQL code to obtain the result
So we will name this object countvintners, and set its display name to "Total Vintners." It is associated with the vintners table, so we pick that one from the list. All that's left is to define the SQL to obtain a value for this object, and it's pretty simple:
COUNT(DISTINCT Vintner)
Enter these values in the form and click on Save when your form is filled out. When you add the object, it will appear in the lower part of your screen. Note that the template builder has changed the SQL so as to be able to find it by its internal name (countvintners).
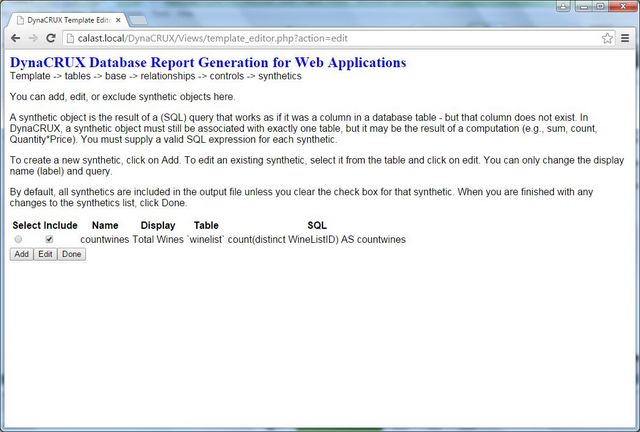
By default, creating a new synthetic checks the box in the include column of the table. This should be interpreted as "include this in the template being built or edited." If you un-checked the box, then the synthetic will simply be ignored when writing the output XML file. Why would you do this? It is more common in editing, when you feel a synthetic will no longer be needed, or you have replaced it with a more useful one. Also, if you are creating a "subset template" for a set of users with restricted access, you might not want them to see this when they are designing reports.
Once a synthetic has been created, you can change your mind about the display text or the query. To change these, you click on the radio button in the select column that corresponds to the synthetic you want to change. Then click Edit. This will bring up the same form as used in adding a new synthetic, but it will be populated with the current values. Since the name of the synthetic is its unique identifier, it would not be reasonable to change it. Also, you can't change the table associated with the synthetic. If you want to change these, you must create a new synthetic and not include the old one. To replace the display text or SQL, just change it on the form and click Save. It will update the displayed synthetics.
You can add more synthetic items by clicking on Add and repeating the process. When you are finished, click on Done to move on to the next stage.
Reviewing Display Names
Display Names are the names used in reports, and in Report Designer. These may be quite different from the names of columns in your database table.
The schema analyzer does its best to come up with display names based on the names you used as column names when you created your database tables. But it's fairly likely that you can come up with better ones, either because your database names don't have capitalization and spaces, or because you commonly use a different name when talking to your users. It's easy to fix this prior to generating your template. Remember that you can always override it in the report file, but you might as well fix it once in the template file.
The template builder presents a list of all the objects in the system. This includes both ones found by the schema analyzer, and ones you defined as synthetics. We also show you the table where it is located, the data type (e.g., char, int) and the width to help you make your selections.
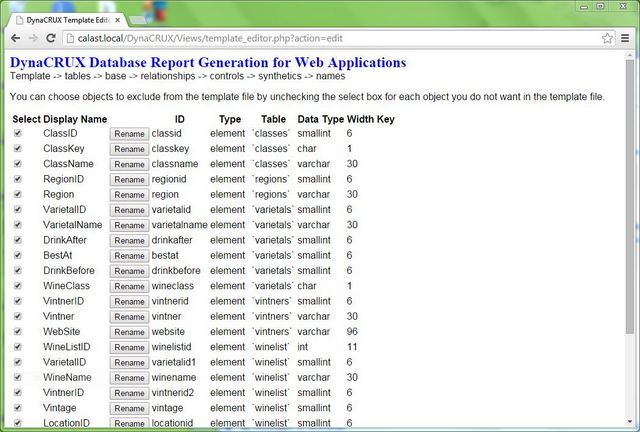
You will notice that this table looks a bit different from the ones you've seen before, because there is a Rename button for each display name. What this means is that you can edit it by simply clicking on the button and specifying a new name in the pop-up dialog box. The check boxes work as always - if it's checked, the object will be included in the template file.
Review this and modify any names you wish, make sure the right boxes are checked, and then click Next to continue.
Saving the Template
So far, the template you have designed is just stored in memory within the Template Builder web application. Assuming you want to some day run reports against it, you will need to save it to the Templates directory on your server. You are prompted for the name of the template, and given a button to click on to save it. DynaCRUX knows where to put things and how to name them. So, if you call your template winedb.xml, then it will be saved as /Templates/winedb.xml in the DynaCRUX directory structure. That way, the report designer knows where to find it.
We will talk more about how you interactively create a report based on your template shortly. But first, we need to discuss controls and filters a bit in Chapter 5 - Run-Time Controls.