California Ajax Solutions Team
www.CalAST.com
The CalAST Auth System
Kenneth F. Greenberg
This document describes the CalAST Auth system, just called Auth for the remainder of the document. Since there are other systems called Auth, including the one included with PEAR, this can be somewhat confusing. It also brings up the question of why another user authorization system is needed. The answer to that is simply that I have worked with a number of clients, all of whom had different requirements for user authorization. There was no one-size-fits-all solution, even though other systems are extensible. So I decided to create the union of all the features into one package, make it configurable and database-independent, and use it in all future sites. Like PEAR Auth, this Auth package can be based on PEAR MDB2 database interface, which will work with most available database software. But it may also be used with the built-in PDO software in the PHP language, which means it works even where MDB2 is not available. In either case, this becomes a write-once system, and if the user changes database programs, no code should have to be modified except the configuration file.
What is an Authorization System?
The next question the reader is likely to ask is why such a thing is necessary in the first place. As always, we go back to the idea that the web is a client-server system. The client (the user's browser) communicates with a web server, whose job it is to deliver web pages. But it is often the case that either we wish to protect out pages from being seen by people we don't know, or else we wish different users to see different things when they visit our site. In the modern world, there is much data available that deals with sensitive material, like medical records or financial information. So some form of protection is required.
Normally, this is implemented by assigning each authorized user of the system with a username and password. Only those users who know both these things are allowed to enter the site. The username and password are traditionally stored in a database. The database has its own server, which may or may not be the same machine as the web server - but certainly the servers must be able to communicate.
While virtually every user of the web understands the idea of user names and passwords, there is much more that an authorization system can (and should) provide. Clearly, every system is going to be a bit different, so the authorization software (which runs on the web server) must be able to be configured to provide exactly the right set of features for the site. And, of course, this may change over time, so it should be possible to make adjustments without rewriting everything.
Features
In addition to the basics, an authorization system may have the following useful features.
- Time stamping of events, such as the creation of authorization information, modifying such information, or recording the last time a user logged on.
- Error logging of login failures, which can help assess how well the system is working or if someone is trying to break in.
- Clearance levels, which control access to various web pages. For example, managers probably need to do more things than lower level users, so some web pages may be "managers-only."
- Enabling and disabling of user access, should a problem arise. You might start every new user out as disabled, and enable them after they have been trained on how to use the site.
- Random password generation - it is common to generate a random password for new users which can be sent to them via email with a request to log on to the system and set their own password. This implies that a site administrator can retrieve such information if the user forgets his or her password. A good system will generate passwords without confusing characters like the number one and lower-case 'L' which look the same in some fonts.
- Password hints that can be set by the user to act as a reminder for remembering the password they set - and not having to call the site administrator every time this happens.
- Authorization fields can be added to an existing table in the database, or else can be a standalone table containing only authorization information.
- Field names that are completely flexible - if an existing table is in use, it should be possible to map those to the names used by the authorization system.
- Built-in protection against SQL injection attacks may be possible, depending on the database in use.
This Auth package can provide all, some, or none of these features by changing the configuration file.
Integration with Existing Systems
Like all authorization systems, Auth works with a database to store and retrieve information. A table in that database stores information about users of the system.
Unlike most authorization packages, Auth gives you the choice of creating a standalone table that is only used by Auth, or of integrating Auth into an existing table in your database. For example, most organizations already store information about the people (employees, customers, etc.) that use their system. If you already have such a table but want to add system access control to it, Auth will simply add new fields to your existing table to provide these new capabilities.
When you configure Auth, you tell it whether or not you want a standalone authorization system. If you want to use your existing table, you can add the new fields yourself and tell Auth about them, or you can let Auth modify the table using a provided script.
Implementation
Different domain hosts provide different capabilities. There are, however, a few things that are universally found - the PHP language (at level 5 or better) and the MySQL database. (Some very inexpensive hosting companies may charge extra for MySQL databases, or limit the number.) Thus, Auth is written in PHP, a language that runs on the web server. Other server-side languages (e.g., Java) also have authorization packages, but not all domain hosts support Java. Other databases are in use, and Auth can be configured to work with any database supported by the MDB2 package or PDO.
Please bear in mind that this package is part of a solution, and does not include any client-side software. The web designer must provide web pages for managing users, and for users to manage themselves. Typically, the web site administrator would need a user management page where users could be enabled or disabled, passwords that are lost could be reset, or outbound email about system access could be initiated. In addition, most web sites with login capability provide some pages for users to manage their own accounts, allowing them to change their password and possibly to change their user login name. All of this is outside the scope of Auth.
Of course, all these “client-side” activities also require server-side support, but the point of Auth is to make such scripts trivial to write.
Auth consists of a data model (class file) and a prototype configuration file. The user modifies the configuration file as needed, then installs both files on the web server. Small scripts must be provided to use the Auth class, but these are generally only a few lines of code in most systems. They are easily integrated into existing web pages as PHP code blocks, or may be stand-alone files. Examples are provided.
Security
In the interest of preventing unauthorized access, all passwords are stored in encoded form in the database. This is a variant of MD5 encoding, which is fairly standard for web security. Site designers are encouraged to only pass encoded passwords across the client-server interface, although this cannot really be enforced by Auth.
Since passwords are encoded, there is really no way to recover a user's password. They are not stored in human-readable form. This should be considered a positive attribute of Auth, and virtually all such packages work this way. If the user cannot remember a password, even after looking at a hint, then the only real option is to reset it and generate a new one. This requires that the random password option be enabled. Of course, it is always possible for a site administrator to assign passwords and keep a record of them elsewhere, but this should not be considered good practice.
If you are using the MySQL database, the package may be configured to escape user names as a means of preventing SQL injection attacks. This takes advantage of the PHP MySQL library having a built-in function for this purpose. If you are using some other database, it is certainly possible to modify Auth to work in that environment, but you will need to provide your own code to handle this situation. There are many good solutions on the web.
User Management
As noted above, a web site that allows login will almost always require some administration. The amount of work that the site manager or administrator needs to do will depend on the complexity of the saved information. Happily, the Auth package provides you with all the tools you need to manage users, with minimal coding required to tailor your management web page to your site design.
You also have some flexibility in how you want to interact with your Auth data. Since we are great believers in Ajax techniques, our natural inclination is to have most of the code run in the site manager's browser and pass small packets of information to the web and database server as needed. But it is equally valid to do all the work on the server. We have provided an example page where information about current users is retrieved from the database and displayed as a table in the site manager's browser. This is a fairly full-featured configuration. There are about twenty lines of PHP code required to extract everything from the database, and the user interface is built from standard CalsAST GUI objects. No styling is provided, as the site designer will want to match other pages in a real system.
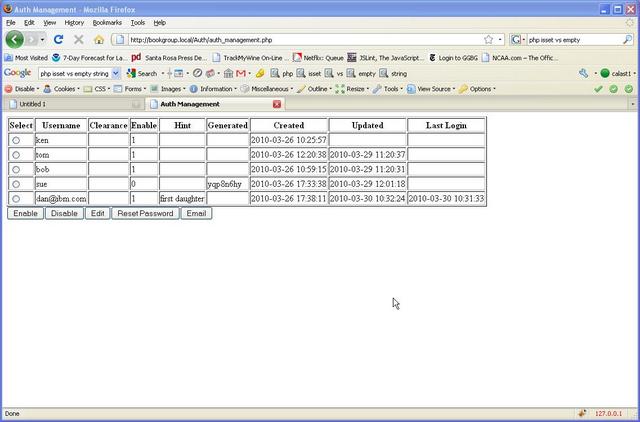
Buttons are shown to allow the user to manipulate the information as needed. The style of the sample page is to use a selectorTable JavaScript object. The operator chooses one of the users by clicking on the associated radio button, then clicks on an "action button" to perform that action on the selected user. In this example, a small JavaScript function catches the event when the user clicks on a button (e.g., Enable). It checks to see that there really is a currently selected user and transfers control to a web server script, passing the username as 'id.'
To show you how simple the code is on the server side, we will just include it here without error checking. (Don't worry if you are not familiar with PHP, we'll explain it in a minute.)
require 'CalastAuth.php';
$auth = new CalastAuth;
if ($auth->enableUser($REQUEST['id'])) {
header('Location: auth_management.php');
}
The first line simply says that we are using the CalAST Auth package. The second line creates a new Auth object. The third line does the actual work. It sends a message to the Auth object, telling it to enable the user whose name was passed in as 'id' from the browser. Since we are not using Ajax techniques here, we simply redirect control back to the original sample management page. This will cause it to fetch user data one more time, and the table will now contain updated information.
Self Management
Ideally, the user can manage some of his or her own account information without assistance from the site administrator. Work that falls into this category includes changing username, changing password, and setting a new password hint if the system has been configured to support hints. Clearly, the web site designer gets to choose what the user is allowed to do, and to provide appropriately-styled pages to accomplish the chosen tasks. The Auth package is simply there to provide a small amount of code on the server site to update the database.
Normally, this sort of activity is accomplished through form submission. The form is filled in by the user, possibly validated on the client side (e.g., no blank passwords should be allowed), and then sent to the server. The server script that receives the form will simply create a new Auth object and sent it an appropriate message to accomplish the work required. This is pretty much the same as the example provided under User Management for enabling a user. The idea here is that the Auth package does the "heavy lifting" and the site designer just has to provide a few lines of code to make that happen.
User login
Of course, you will want the user log in to the system before changing anything about his or her account. The Auth package provides a login function that validates the user's password and returns true if it is able to do so. It also provides a number of error checks, some of which are configuration dependent. Here is what the login function does.
- Checks the database to see if the login name is valid
- If so, checks to see that this is the correct password for this user
- If so configured, checks to see that login is enabled for this user
- If time stamping of logins is configured, updates the database with the current time
Auth also provides an error log file capability. If you have specified a file name for logging, then any errors detected during the above process will be recorded in the log file. The site administrator can then investigate why these problems have occurred.
A sample login server script is provided. This PHP program uses what is called a session variable to store information on the server about the logged in user. (It really only stores the name of the user at present.) This does require cookies to be enabled, so that the session ID can be passed back and forth between client and server on every transaction to make sure we are still talking to the same user. But, since the name of the user is known, the update script can make sure that the user is really logged in before allowing any changes. For additional security, it is possible to ask the user to provide the password along with change requests, although this is entirely up to the site designer.
Configuration
This section describes how a site administrator would configure the Auth package to meet the requirements of the web site.
The Auth package stores configuration information in a file named CalastAuthConfig.php, which contains a good deal of documentation on how to modify it. Every web page that uses the Auth package reads this file at startup to find out where the database table is located and what features need to be supported.
The first design decision that has to be made is whether to store Auth information in an existing table of users, or to give it a table of its own. Only the site designer can really make this determination. The only requirement for adding Auth to an existing table is that a numeric primary key (a unique value identifying each person in the table, like employee number) must exist. This is standard practice in most implementations.
The reason for this is that Auth will not add records to your existing table, which has the potential to disrupt an existing system. It can add information to the records that you have already placed in the table, since Auth has its own set of fields in the record. But Auth needs some way to find the record to be modified when a new user is added. Once information is added to the table, Auth only uses the user login name field for all its work. But there must be a way to get that information into the database table first, and the primary key is how we do this.
For standalone implementations, a numeric primary key will be created. This is a requirement of the MDB2 package used by Auth. If, in addition, you want to create a foreign key that references some existing table with a unique identifier, you can ask the table generator to create such a field for you. This only applies to standalone authorization tables. It's up to you to add a constraint to your database if you want one.
For shared tables, you specify the existing primary key of the table.
The first item in the configuration file that needs to be configured is the DSN (Data Source Name). This identifies the name of the database you will use, and follows a fairly standard format. The MDB2 package provides a number of different ways to do this, but the simplest is the string format, which looks something like this. It specifies which database package you use, the login name and password needed to access that database package, the name of the host computer (database server), and the name of the database itself.
$CALASTAUTH_DSN = mysql://username:password@localhost/dbname
The PDO format is a bit different from the MDB2 format.
$CALASTAUTH_DSN = "mysql:host=localhost;dbname=mydatabase,username,password";
The second item you need to specify is the name of the table that will store Auth information:
$CALASTAUTH_TABLE = 'members';
Next, it is time to define features. A minimal system needs only a user name and password. But other features require additional fields. Sample scripts are provided to create a new standalone Auth table, or to modify a table that already exists in your system. So the next thing you need to do is decide what features you wish to implement. Once this is determined, the configuration file is modified to set the feature enable variables for the features you want to use to true, and the other to false. If you have existing field names in your database table, you should then set the configuration file field names to match. Otherwise, you can just use the defaults. Make sure that if you enable a feature, the corresponding database table fields are also set. Comments in the configuration file explain this process.
This table describes the configuration choices available to you, and provides information on what they do. For brevity, I have left off the prefix on the name strings. So, for example, STANDALONE in the table is really called CALASTAUTH_STANDALONE in the configuration file. The Flag is a boolean (true/false) variable that turns the feature on or off. The Column is the name of the database table column used to store information. You may use the default column name, or modify it to match your database preferences.
There is no flag associated with the foreign key reference to another table. You just specify it if you need it. It is only used if you are generating a standalone table that needs a reference to some existing table.
| Flag | Column | Purpose |
|---|---|---|
| STANDALONE | n/a | Set to true if you want a standalone Auth table, false to use an existing table. |
| n/a | COL_FOREIGN_KEY | If specified, adds a foreign key column that can be used to reference another table. Meaningful only if in standalone mode. |
| n/a | COL_FOREIGN_KEY_TYPE | The type of the above field (e.g., 'integer'). Both the key and the type must be defined to be used. |
| CLEARANCE | COL_CLEARANCE | Enables clearance level for each user |
| ENABLE_ACCESS | COL_ENABLE_ACCESS | Provides a way to enable or disable access on a per-user basis |
| HINT | COL_HINT | Provides storage for a user-specified password hint |
| GENPWD | COL_GENPWD, COL_GENPWD_ACTIVE | Provides random password generation and storage |
| TS_CREATE | COL_TS_CREATE | Provides storage and code to record when authorization information is added for a user |
| TS_UPDATE | COL_TS_UPDATE | Provides storage and code to record when authorization information for a user is changed |
| TS_LOGIN | COL_TS_LOGIN | Provides a way to record last login for each user |
| LOG_FILE | n/a | Provides the name of a file to which login errors are written by the login method |
| MYSQL | n/a | Flags that MySQL escape function should be used on usernames to prevent attacks |
Creating the Data Fields
Once the configuration file is set, you can run the script to create or alter the database tables needed by Auth. These are designed to be run only once in the present Auth configuration. Thus, reconfiguration if you decide to add a feature later must be done manually. It should also be noted that the only "downside" of turning on all the features is that the database will be larger, and possibly a bit slower. However, with today's powerful database servers, this may not even be noticeable.
A script called CalastAuthGenTable.php is provided to either create a new table in your database or to modify an existing one. The configuration file tells the script which option you have chosen, and which database table to use. It also specifies the names of the various columns in your database. This script can be run from the command line (e.g., on a Linux system) or from your browser. You should examine your database after creating the data fields that all is as you expected.
It should also be noted that the script generates a table that uses the InnoDB engine, so that any foreign key reference you might have specified can be enforced. MyISAM does not support foreign keys.